

Key Factors to Consider When Selecting Wall Panels
Room Functionality and Environmental Needs
The type of wall panel chosen really depends on what the room is used for. Decorative options work great in living spaces where looks matter most. But think twice before putting them in kitchens or bathrooms. Moisture resistant stuff is a must there. Environmental conditions play a big role too. Humidity levels inside homes can actually damage certain materials over time, especially things like wood products. Sunlight exposure matters as well since too much direct light tends to fade colors pretty quickly. For rooms that see lots of activity day after day, going with something tough and durable makes sense. These panels last longer and won't need constant fixing up later on.
Material Options: Balancing Aesthetics and Practicality
When picking out wall panels, looking at different materials matters a lot because nobody wants something that looks good but falls apart after a month. Take wood for instance it brings warmth and that natural look many people love, though scratch resistant? Not so much. That's why folks often end up sanding and refinishing them every few years. PVC panels work wonders in damp areas since they don't absorb moisture like crazy, which saves headaches later on. And then there's MDF boards these cost less upfront and come in all sorts of finishes from wood grain to sleek modern stuff. But let's face it, nobody wants to spend hours maintaining their walls just to keep them looking decent. People who care about sustainability should know there are now plenty of green alternatives available without sacrificing style or function. Some companies even offer recycled content panels that still manage to look pretty darn good in any room.
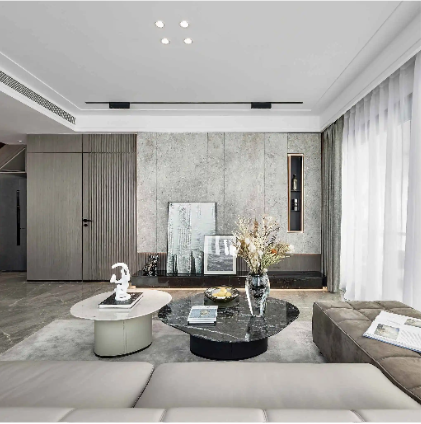
Style Alignment with Existing Interior Design
Getting the right look at home means making sure wall panels match up with what's already there in the space. When panels don't fit well with other design elements, they either make things better or worse for the whole room feel. Most people pick panels based on popular styles these days. Think about it this way: smooth panels in basic colors work great for spaces going for that clean, simple vibe. But if someone wants something cozier, textured or patterned panels really stand out against wood floors or stone countertops in older homes. Colors matter too. A bold red panel next to gray furniture creates interest without being overwhelming. On the flip side, matching tones throughout makes everything seem larger somehow.
Budget-Friendly Choices Without Compromising Quality
It's totally possible to find good quality wall panels that won't break the bank. A little digging around different suppliers might turn up some great deals on premium panels priced below market rate. Looking at costs shouldn't just be about what's cheapest upfront. Think about how long these panels will last and how much upkeep they need over time. Sometimes paying a bit more initially actually saves money down the road when there's less need for replacements or repairs. Want to cut costs even further? Many people install their own wall panels instead of hiring professionals. There are tons of helpful guides and video tutorials online that walk through every step of the process. With some patience and basic tools, anyone can achieve a professional looking result without spending extra cash on labor.
Types of Wall Panels and Their Best Uses
Wooden Panels: Timeless Elegance for Living Spaces
Wood panels bring something special to any room they grace. There's just something about the way wood feels and looks that makes a space feel warm and welcoming. People love how different woods transform a room's character too. Cedar has this lovely scent that fills the air, while oak brings in that classic strength and texture we all associate with quality craftsmanship. Most folks don't realize how long these panels can stick around if treated right. A simple weekly wipe down usually keeps things looking good, and every few months a bit of coconut oil works wonders for bringing back that natural glow. Some old timers swear by beeswax instead, but either way regular attention makes all the difference between a panel that lasts decades versus one that fades away after just a few years.
PVC Panels: Moisture-Resistant Solutions for Bathrooms/Kitchens
PVC panels work really well in places where there's lots of moisture, like bathrooms and kitchens. One big plus is how they resist mold and mildew growth, so they last much longer than other materials when exposed to constant dampness. Research shows these panels can withstand wear and tear pretty well too, which means less cleaning and touching up over time something most homeowners appreciate. Plus, manufacturers offer all sorts of colors and designs now, so people can match their kitchen backsplash or bathroom walls with whatever style fits their home decor without sacrificing the practical benefits that make PVC such a smart choice for wet spaces.
MDF Panels: Customizable Surfaces for Creative Flexibility
People love MDF panels because they're so versatile and let folks get really creative with their projects. The surface is super smooth, making it easy to paint or apply different finishes without much hassle. Most folks use them for things like decorative walls or building furniture pieces that look good while keeping costs down. But there's one catch worth mentioning about regular MDF boards. They don't handle moisture well at all. If someone plans on working in areas where humidity might be an issue, going with the special moisture resistant version makes a lot of sense. Otherwise those beautiful creations could end up ruined after exposure to water damage.
3D and Decorative Panels: Adding Depth and Visual Interest
Three dimensional and decorative wall panels add real character to any room, creating depth that changes how we experience space. They work especially well in cutting edge homes or stylish cafes where people want something eye catching on the walls. Interior designers have noticed a shift toward these kinds of statement pieces lately because they turn plain old walls into amazing centerpieces. This trend is changing what looks good in modern decorating circles, moving away from flat surfaces to things that actually stand out and grab attention when someone walks into a room.
Essential Preparation for Wall Panels Installation
Surface Preparation: Cleaning, Leveling, and Drying
Getting wall panels installed right starts with getting the walls ready first. Start off by giving those walls a good clean so there's no dust, grime, or leftover glue messing with how well the panels stick later on. Don't forget to fix up any cracks or gaps either because they'll cause problems down the road when panels start coming loose. Grab a putty knife or some wall filler stuff to patch those spots until everything feels smooth to the touch. After that, run a level across the wall surface. If things aren't flat, adjust them before proceeding since uneven bases mean panels won't sit right or stay attached long term. Drying time matters too depending on what products were used and current weather outside. Always read those package instructions carefully about drying periods to steer clear of headaches mid-project. And watch out for humid days specifically since moisture in the air really slows down drying processes, making bad timing choices extra costly.
Tools and Materials Checklist for a Smooth Process
Getting ready with proper tools and materials makes all the difference when installing wall panels. Start by making a good list of what's needed: level, measuring tape, either adhesive or nails depending on preference, plus whatever cutting device works best for the specific panel type being used. Quality tools really do matter for how things turn out looking at the end, which most pros will tell anyone who asks. Safety stuff shouldn't get overlooked either. Always wear gloves and protect those eyes while working. Taking these basic safety steps creates a much better work environment overall and cuts down on potential mishaps. When everything gets organized properly beforehand, the actual installation tends to go smoother without too many headaches along the way.
Accurate Measuring and Layout Planning Techniques
Getting good measurements and thinking through how panels will fit together makes all the difference when installing wall panels. Start by taking careful measurements of the wall area so panels actually fit right and don't end up cutting too much material. Templates or simple guides really help here and cut down on mistakes during installation. Don't forget about things like power sockets or decorative details in the wall either since ignoring them leads to messy looking results. A smart move? Sketch out where these special spots go on paper first before marking anything permanent. This saves money in the long run because nobody wants to rip out half finished work later. Most folks find that spending extra time upfront pays off big time when everything lines up just right from start to finish.
Step-by-Step Wall Panels Installation Guide
Choosing the Right Installation Method: Z-Clips vs. Adhesives
Knowing the difference between Z Clips and adhesives when installing wall panels makes all the difference in getting good results. Z Clips give a solid mechanical fix that works great for heavier panels because they let people take them off and move them around easily. That's really handy in areas where someone needs to get behind the panels later. Adhesives create a much cleaner look without visible fasteners, which is why many folks go for them with lighter panels or when they want something that stays put forever. Picking the right method depends on several things including how long it takes to install and what it will cost. Z Clips tend to be quicker for bigger panels but can set back the budget more since they cost more per unit. Adhesives usually take longer to apply properly and need more hands-on work from installers. People often run into trouble with adhesives if they don't wait long enough for them to cure properly, ending up with weak bonds. Similarly, misaligned Z Clips will leave panels looking crooked. The key to avoiding these issues lies in preparing surfaces thoroughly before starting and taking extra care during alignment steps.
Securing Panels: Tips for Avoiding Gaps and Misalignment
Getting panels secured right from the start helps avoid those annoying gaps and crooked lines that nobody wants to see. Most folks find that using clamps along with some good quality spacers makes all the difference. The pressure gets spread out evenly so panels sit flat against whatever surface they're going on. Without this step, things tend to shift around after a while, which ruins how everything looks once it's finished. Take some time off between sections too. Step back every now and then to check if everything still lines up straight. Those little breaks let workers fix any problems before glue or other fixing agents start to dry. Especially with sticky stuff like adhesives, getting things aligned properly matters a lot. Once it sets, trying to adjust anything becomes a real pain in the neck.
Handling Corners and Edges for a Professional Finish
Getting those corners and edges right makes all the difference when it comes to looking professional with wall panels installed properly. Most folks go for either mitered edges or corner trims depending on what looks best for their space. Mitered cuts give that clean, continuous line effect across walls, but honestly takes some skill to get right without gaps showing up later. Corner trims work great too especially if there are minor flaws in the surface where panels meet. For extra flair around joints, many pros will incorporate different kinds of moldings like crown or baseboard styles that actually make the whole project stand out visually. From talking to plenty of seasoned installers over years working on jobs big and small, one thing stands out time after time: messed up measurements at corners always cause problems down the road. Either gaps form between panels or they just don't sit flush against each other. Fixing this means taking careful measurements twice before cutting anything, double checking angles with digital tools now available even for DIY projects, and making sure every piece fits together snugly so nothing sticks out awkwardly once everything goes up.
When to Hire a Professional vs. DIY Approaches
Deciding between hiring someone pro or going the DIY route really comes down to how big and complicated the job actually is. For major renovations or complex design work that needs special skills to install properly, getting help from professionals often makes sense. These folks have done similar jobs before, so they tend to deliver better finishes and know what to do when unexpected problems pop up during the process. On the flip side, doing things yourself can save money and feel pretty rewarding too, especially if we're talking about straightforward projects within reach of average homeowners' abilities. When looking at pros though, don't just pick anyone off the internet. Take time to check out their background working with particular materials, look at photos from previous jobs they've completed, and definitely talk to people who've used them before. A good contractor will want to show off their portfolio anyway.
Maintaining Your Wall Panels Post-Installation
Wall panels need proper care after they're installed if we want them to look good and work well over time. Each material type has its own needs when it comes to cleaning and upkeep. Wood panels respond best to gentle treatment. A soft cloth works great for dust, while stubborn spots can be tackled with a lightly dampened cloth and mild soap solution. Just steer clear of strong chemicals though, since these can really mess up the finish. PVC panels are actually pretty low maintenance overall. Most of the time, a quick wipe with something gentle will do the trick. With MDF panels, water is definitely our enemy. These should only ever get a very slightly damp cloth applied carefully. Creating some kind of routine makes sense too. Dust regularly and check things out every six months or so. This helps catch any issues early and keeps those panels looking fresh for years instead of just months.
Keeping panels protected from both sun damage and humidity remains a critical part of their overall maintenance. Applying UV blocking coatings helps shield them from harmful rays, whereas good airflow around installation areas prevents problems caused by excess moisture buildup. Prolonged sunlight exposure tends to fade colors over time and actually weakens the structural properties of many materials used in panel construction. Moisture is equally problematic it can lead to warping surfaces or create conditions where mold starts growing. Regular inspections based on real world experience rather than just theoretical guidelines have proven effective at preserving panel quality. These routine checks typically catch small issues before they become major concerns, helping keep panels looking good and functioning properly all through different seasons.
Fixing small wall panel damage instead of swapping out whole sections makes good sense for keeping things looking nice. Most problems are either scratches or dents, and these usually respond well to touch up kits or specific fillers designed for different panel materials. Homeowners generally find that following simple steps works pretty well most of the time. Sand down the rough spots first, then apply some filler material, and finish it off with matching paint. But when damage gets really bad, sometimes there's no choice but to replace the panel altogether. Getting the right material match matters a lot if we want everything to blend in seamlessly. Before jumping into any repair work, take a close look at how bad the damage actually is and figure out what makes the most sense in each situation.
FAQ Section
What materials are suitable for humid environments?
PVC panels are an excellent choice for humid environments due to their water resistance.
Can wooden panels be used in high-traffic areas?
Yes, wooden panels can be used in high-traffic areas if properly maintained and chosen for their durability.
How can I save costs on wall panels installation?
You can save costs by opting for DIY installation and researching suppliers for high-quality panels at discounted rates.
Are there eco-friendly wall panel options?
Yes, there are sustainable and eco-friendly wall panel options available that do not compromise aesthetics or usability.
How should wall panels be maintained post-installation?
Maintenance depends on the material; dusting, using non-abrasive cleaners, and conducting regular inspections can help preserve wall panels.